Hang 'Em High!
by Jonathan Harris and Margie Gear
Toys Toys Toys! Our birds need them for exercise and stimulation, for cognitive development, and for their emotional wellbeing. An abundance of good toys can reduce anxiety, screaming, aggression, self-mutilation and other problem behaviors (in frustrated human caregivers as well as in our birds). They even may deter feathered flockmates from improvising toys out of our baseboards, furniture, pencils, curtains, shirt buttons, shoulders, earrings, ears, and all those really important bills we were just about to pay.
Well, perhaps not. But there’s no doubt toys are essential to the enrichment and happiness of our flocks. And because birds chew through them at a prodigious rate and appreciate novelty and variety, it behooves us to change and replenish their stock frequently and figure out creative ways of arranging them.
Besides the many available stand-alone toys and play gyms, there are countless hanging toys and perches, including swings, rings, boings, atoms, and cluster toys. Some of these are small enough to fit comfortably in a cage and rightly belong there.
But we don’t want our cages overcrowded. So we like to have some larger toys outside, in our bird rooms or aviaries, most often suspended from the ceiling. The simplest way of doing that is to hang each toy from its own hook, anchored into a ceiling beam or joist. A more flexible approach is to attach them to a rod or track, which allows them to be adjusted, repositioned, and replaced.
Margie Gear and husband Keith Dickens came up with a very elegant track system to hang the boings, atoms, and ceiling guards they purchased from www.motherpluckinbirdtoys.com.
We purchased lighting tracks from Home Depot, Margie explains. The hardware to attach the gyms to the tracks required some creativity. We wanted something that could bear the weight of the gyms, would tighten to secure them in place, and could be loosened to move them around.
After you obtain your tracks, here's what you do: For each toy you want to hang, purchase a 5/16-inch eyebolt, two nuts and two washers, about 3/4-inch diameter or whatever fits nicely inside the track. Thread the nut down the eyebolt and then place a washer on it. Put on the other washer and cap it with the second nut. The top washer/nut assembly slides into the actual track and the nut sits on top (i.e. the roof side of the track). There is a plug on the end that comes off (one screw) so you can slide everything into the track.
Tighten the bottom nut/washer against the track so the toy won't move around. When you want to move it, just loosen the bottom nut and reposition it accordingly.
Keith drew the following diagram with instructions:
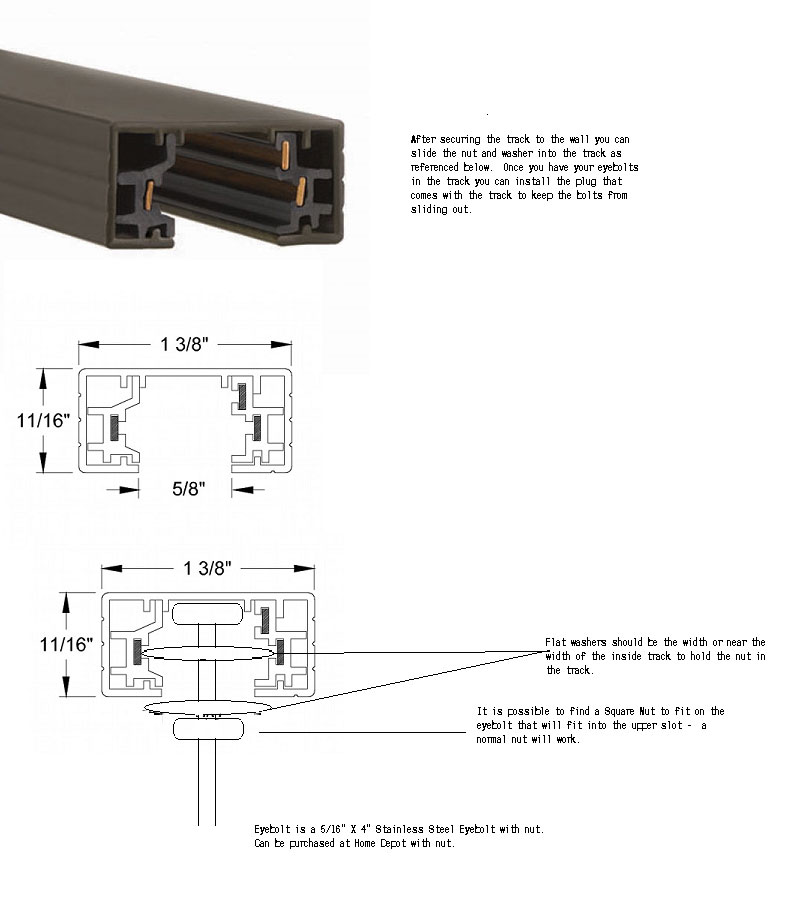
Margie and Keith used a Hampton Bay 4-foot Linear Track Section (Model # EC750WH) and a Lehigh Stainless Steel 5/16-inch x 4-inch Eyebolt with Nut (Model # 7133) for each toy they wanted to suspend.
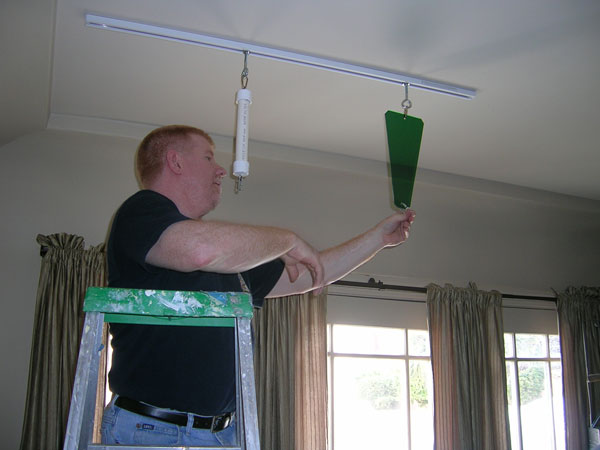
Instructions on how to install the track to the ceiling are included with the track and should be followed based on your ceiling type and if you are installing to a stud or to sheetrock.
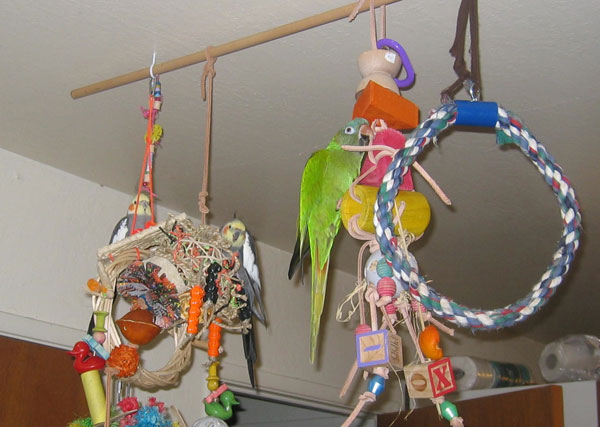
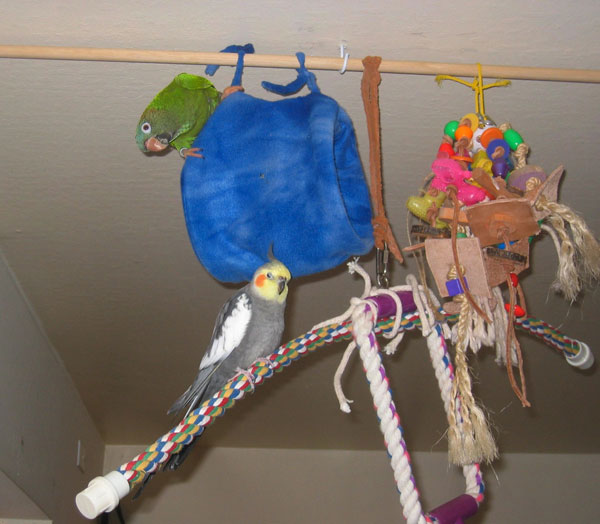
If Margie and Keith’s system seems a bit daunting, here’s a less elegant but quite workable method we’ve used to construct two similar hanging toy complexes at opposite ends of our dining room-kitchen.
I used a stud sensor to find the ceiling beams, then screwed two 2-9/16-inch ceiling hooks into them a couple feet apart for each toy complex (in one case I screwed the hooks into adjacent beams, in another I screwed them a couple feet apart along the same beam). The precise distance doesn't matter. Then I took a (roughly) 3-foot length of dowel rod and pressed it into the hooks. Again, the exact length is unimportant. I chose a thickness (5/8" true diameter) that gave a good "press fit"—it snaps into place, stays there firmly, and pops out with moderate pressure. This gives us an easily-removed rod about an inch or two below the ceiling from which we can hang toys and swings using almost any kind of cord, twine, or thong.
The system is simple and flexible. Everything can be changed or re-positioned quickly: Untie a toy or slide it off the end of the rod—whatever's easiest; slide it back and forth on the rod to make it closer or farther from the next toy or swing; move the rod itself back and forth, or just change rods! And it’s quick to disassemble and clean! Are guests coming? Take the whole complex down in seconds, and hang a couple pots of asparagus ferns using the same ceiling hooks.
Note that you could use PVC pipe instead of wooden dowel rods. And if you used PVC, you could easily incorporate T-joints and make short, side branches to suspend whole "forests" (or maybe "kelp forests") of toys together in the same area. The important thing is finding the right combination of hook and thickness of rod to give you a good press fit.
Whichever system you use, or however you adapt it to your home and flock, this arrangement is great both for birds and for us terrestrials as well, since the toys and swings can be hung directly above cages or at higher-than-human-head level, saving floor space. Having lots of outside toys also helps reduce the density of toys within our birds' cages. Our flock spends most of its time out, and I was uncomfortable having so many toys (especially the heavier ones) inside their cages where they might cause injury through panic wing flapping or entanglement.
Our birds love these ceiling toy complexes and spend many happy hours playing or just hanging out there. We have replaced and repositioned the individual toys and swings many times during the past couple years as old ones get destroyed and the birds’ interests and patterns of social interaction change.
Here are some photos of our play stations under construction and in use:

And here’s a video showing three of our flock members playing together on one of these complexes: